Colostomy: Irrigating Your Colostomy
A colostomy is a surgical procedure to create an opening (stoma) in your abdomen that connects part of the large bowel (colon) to the exterior. This allows the passage of stools and gas through the stoma. Irrigating a colostomy may allow you to have more control over the timing of your bowel movements. It is used less frequently now that pouch systems are more advanced. Talk to your healthcare provider or ostomy nurse if you think this might be a good choice for you. Basically once a day, or once every other day, you irrigate by flushing the colostomy with warm water. To irrigate, you need an irrigation kit, hook, and water-soluble lubricant. Before starting an irrigation program, get specific instructions from an enterostomal or wound-ostomy-continence healthcare provider.
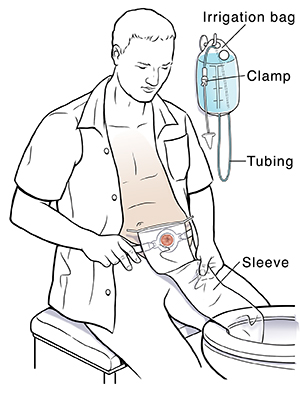
1. Fill the bag
-
Close the clamp on the tubing attached to the irrigation bag.
-
Fill the bag with 1 quart (4 cups) of warm water. Make sure the water isn't too hot. Cold water can sometimes cause cramping. Cramps and nausea may also occur when the water is flushed too fast or if you are using too much water.
-
Hang the bag on a hook above the toilet. The bottom of the bag should be about even with your shoulder when you sit.
-
Hold the tubing over the toilet. Open the clamp slightly to release any air in the tubing. Once water starts to come out, close the clamp.
2. Put on the sleeve
-
Remove the cap or pouch from your stoma. Clean the skin around the stoma with warm water and a soft washcloth. Then dry it well.
-
Sit next to the toilet. Place the round opening in the sleeve around the stoma. Press on the adhesive if the sleeve is self-adhering. Or attach the mounting ring and fasten the belt.
-
Place the open end of the sleeve over the toilet.

3. Insert the cone
-
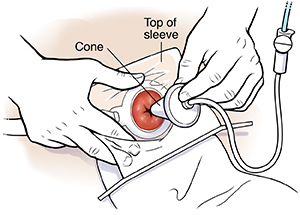
Attach the cone to the tubing on the bag. Then rub a little lubricant on the tip of the cone.
-
Slip your hand through the opening at the top of the sleeve and put the cone into the stoma.
-
Hold the cone in place and slowly open the clamp on the tubing. Allow the water to flow gently into the stoma. This should take 5 to 10 minutes. Then close the clamp on the tubing.

4. Remove the cone and clamp the sleeve
-
Wait about 60 seconds. Then remove the cone and seal the top of the sleeve.
-
Allow stool and water to flow through the sleeve into the toilet for 15 to 20 minutes. Then you can clamp the bottom of the sleeve and get up if you want to.
-
When stool and water stop flowing, remove the sleeve. Empty the sleeve into the toilet.
-
Clean and dry the skin around the stoma. Then cover the stoma with a cap or small pouch.
5. Clean the cone and the sleeve
-
Rinse the cone and sleeve with water. If you wish, mix 1 part white vinegar with 3 parts warm water. Pour it into the sleeve. Hold the sleeve closed and shake it until the sides are clean. Then rinse with water.
-
Hang the sleeve to air-dry.
© 2000-2025 The StayWell Company, LLC. All rights reserved. This information is not intended as a substitute for professional medical care. Always follow your healthcare professional's instructions.